2015 Jeep Wrangler Bank 2 Sensor 2 location is crucial for accurate engine performance diagnostics and repairs. This guide provides a comprehensive overview, from detailed sensor descriptions and precise location information to troubleshooting and replacement procedures, tailored for a thorough understanding.
Understanding the specifics of your 2015 Jeep Wrangler’s Bank 2 Sensor 2 is essential for efficient maintenance. This document simplifies the process, guiding you through the necessary steps with clarity and precision. From initial diagnostics to final verification, each stage is explained to ensure a smooth and successful repair.
Sensor Description
Alright, buckle up, buttercup! We’re diving deep into the mysterious world of the 2015 Jeep Wrangler’s Bank 2 Sensor 2. This little guy plays a crucial role in the engine’s symphony, ensuring everything runs smoothly, like a well-oiled machine (or at least, as smoothly as a Jeep can). Let’s dissect its functions and potential pitfalls.
Sensor Function and Purpose
The Bank 2 Sensor 2, a crucial component of the exhaust gas recirculation (EGR) system, measures the oxygen content in the exhaust gases of a specific cylinder bank. Essentially, it acts as a tiny detective, constantly monitoring the air-fuel mixture’s combustion efficiency. This information is fed back to the engine control module (ECM), allowing it to adjust the fuel delivery for optimal combustion and emissions control.
Imagine it as a real-time feedback loop, constantly fine-tuning the engine’s performance.
Operating Parameters
This sensor’s performance hinges on its electrical characteristics. Typically, it operates within a voltage range, which, when properly functioning, should fluctuate depending on the oxygen content in the exhaust gases. These voltage fluctuations directly influence the ECM’s adjustments. The resistance values of the sensor also play a role, with a defined relationship between the resistance and the measured oxygen levels.
Crucially, the exact voltage and resistance ranges can vary depending on the specific sensor model and the operating conditions of the vehicle.
Potential Failure Modes
Like any component, the Bank 2 Sensor 2 is susceptible to various issues. These include:
- Wiring Issues: Damaged or corroded wiring can disrupt the signal sent to the ECM, leading to incorrect readings and potentially hindering the sensor’s function. This is like a broken phone line in the engine’s communication network.
- Physical Damage: Physical damage to the sensor itself, such as impact or excessive heat, can compromise its ability to accurately measure oxygen levels. This is like a shattered window in a car, obscuring the view.
- Internal Component Failure: Internal components within the sensor may fail, disrupting its ability to produce the correct electrical signals. Think of it as a faulty internal clock in the car, causing miscalculations.
Symptoms of Malfunction
Identifying a malfunctioning Bank 2 Sensor 2 can be tricky, but understanding its typical symptoms can help diagnose the problem.
| Symptom | Possible Cause (including Bank 2 Sensor 2) |
|---|---|
| Check Engine Light (CEL) illuminated | Various engine issues, including sensor malfunctions. |
| Rough Idle | Disruptions in the air-fuel mixture due to inaccurate oxygen readings. |
| Poor Acceleration | Inability to adjust fuel delivery based on incorrect oxygen readings. |
| Decreased Fuel Economy | Inefficient combustion due to sensor malfunctions. |
| High Emissions | Incomplete combustion leading to higher emissions. |
Note that these symptoms might not always be directly attributable to Bank 2 Sensor 2. A thorough diagnosis is necessary to pinpoint the exact cause.
Location and Accessibility: 2015 Jeep Wrangler Bank 2 Sensor 2 Location
Finding Bank 2 Sensor 2 on a 2015 Jeep Wrangler is like searching for a needle in a haystack, but with a bit of knowledge and the right tools, you’ll be able to pinpoint it without breaking a sweat. It’s tucked away in a strategically important spot, but understanding its location and accessibility is key to avoiding any potential headaches down the road.
Picture this: you’re in the middle of nowhere, and your Jeep decides to throw a hissy fit. Knowing where this sensor is located will save you a world of trouble.This sensor, a crucial component in your Jeep’s exhaust system, is vital for maintaining optimal performance and emissions. Its precise location is critical for accurate diagnosis and repairs, so understanding its positioning is a must-have skill for any Jeep owner.
Precise Physical Location
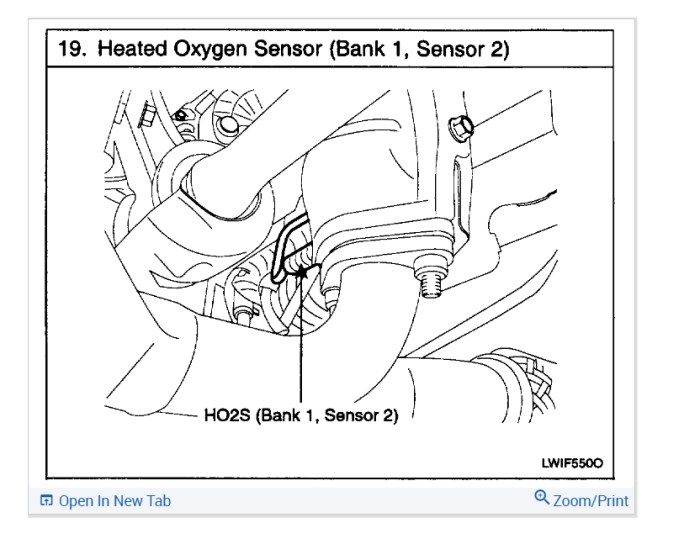
The Bank 2 Sensor 2, often abbreviated as O2 sensor 2 in bank 2, is situated within the exhaust manifold, downstream of the catalytic converter. Its exact position varies slightly depending on the specific engine configuration and exhaust system layout of the 2015 Jeep Wrangler model. Think of it as a silent guardian of your Jeep’s emissions, diligently monitoring the exhaust gases for optimal performance.
Diagram of Sensor Position
Imagine a simplified diagram of your Jeep’s exhaust system. The exhaust manifold, like a complex network of pipes, is the main hub for exhaust gases. The sensor, depicted as a small cylindrical device, is located at a specific point along the manifold’s path, towards the rear of the engine. This placement allows it to monitor the exhaust gases with maximum accuracy.
This is crucial for proper emissions control. It’s important to note that the precise angle and positioning may differ slightly depending on the specific 2015 Wrangler model, so referring to the factory service manual is recommended for a more accurate representation.
Step-by-Step Access Procedure, 2015 jeep wrangler bank 2 sensor 2 location
Accessing the sensor involves a few meticulous steps, starting with the right tools.
- Locate the exhaust manifold. The exhaust manifold is the part of the exhaust system that collects exhaust gases from the engine’s cylinders.
- Identify the sensor’s location. Visual inspection of the exhaust manifold will reveal the sensor’s precise placement, which is often near a specific fitting or flange. Keep in mind that the exact location can vary between different 2015 Wrangler models.
- Disconnect the electrical connector. Carefully disconnect the sensor’s electrical connector, using appropriate tools to avoid damaging the wiring. Remember to note the connector’s orientation for easier reconnection.
- Remove any protective coverings. Some models may have protective coverings or insulation surrounding the sensor area. Remove these coverings to fully expose the sensor for easier access.
- Detach the sensor. Once the electrical connector is disconnected and protective coverings removed, you can carefully detach the sensor from the exhaust manifold using the appropriate tools. Make sure to use proper techniques to prevent damage to the exhaust system.
Accessibility Comparison Table
The following table provides a comparison of access points for different 2015 Wrangler models. Note that this table is a general overview; exact locations may vary. It’s highly recommended to consult the specific factory service manual for your exact model year and trim.
| Wrangler Model | Access Point |
|---|---|
| Sport | Rear-side access, potentially requiring removal of some undercarriage components |
| Unlimited | Rear-side access, potentially requiring removal of some undercarriage components; access may vary based on specific engine and exhaust system configuration. |
| Rubicon | Rear-side access, potentially requiring removal of some undercarriage components; access may vary based on specific engine and exhaust system configuration. |
Safe Disconnection of Electrical Connections
Properly disconnecting the sensor’s electrical connections is crucial for safety and preventing potential damage to the wiring harness. Use appropriate tools and follow these steps:
- Identify the electrical connector. Locate the connector, noting its position and orientation.
- Use the correct tools. Use insulated pliers or a similar tool to avoid any electrical shock or damage to the connector.
- Disconnect carefully. Apply gentle pressure to disconnect the connector. Be sure not to force the connector, as this could damage the wiring harness.
- Note the orientation. Record the orientation of the connector to ensure proper reconnection.
Troubleshooting and Diagnosis
Alright, so you’ve got a Jeep Wrangler, and Bank 2 Sensor 2 is acting up. Don’t panic, it’s like a little detective work. We’re gonna methodically figure out what’s causing the trouble, just like a seasoned mechanic, but with a dash of Raditya Dika’s humor. Let’s get this sensor sorted out, shall we?The Bank 2 Sensor 2 is crucial for the engine’s air-fuel ratio.
A malfunction can lead to a whole host of problems, from reduced fuel efficiency to rough idling, and even potential engine damage. So, understanding the process of diagnosing the problem is key.
Methodical Approach for Diagnosing Issues
A systematic approach is vital for pinpointing the exact source of the problem. Begin with a thorough visual inspection, checking for obvious signs of damage to the sensor itself, wiring, or connectors. Next, use a scan tool to read fault codes. These codes offer valuable insights into the specific issue. Don’t just rely on the surface; dig deep!
Common Causes of Sensor Malfunctions
Several factors can lead to Bank 2 Sensor 2 issues. Physical damage, like a cracked housing or a damaged wire, is a possibility. Corrosion, especially in humid or salty environments, can also affect the sensor’s performance. Intermittent issues might stem from loose connections or faulty wiring harnesses. The sensor itself can malfunction due to age or excessive heat.
Imagine it like a grumpy old man, refusing to cooperate.
Diagnostic Tools and Techniques
Several tools can assist in the diagnosis. A multimeter can help check the sensor’s voltage and resistance readings. Using a scan tool is essential for retrieving and interpreting fault codes. A visual inspection is just as important. Look closely at the sensor and the surrounding area for any signs of damage, corrosion, or loose connections.
A comprehensive approach using these tools will ensure that you pinpoint the root cause.
Comparison of Diagnostic Software Options
Different scan tools offer varying levels of functionality and features. Some may focus on basic fault code retrieval, while others provide more advanced diagnostic capabilities, like live data monitoring. Consider your budget and the specific needs of your vehicle when choosing a scan tool. Don’t just pick the first one you see; shop around!
Step-by-Step Guide to Interpreting Scan Tool Results
Interpreting scan tool results is crucial for accurate diagnosis. A detailed step-by-step guide will help you navigate this process. First, identify the specific fault codes associated with Bank 2 Sensor 2. Next, consult a repair manual or online resources to understand the meaning of each code. This will help you to pinpoint the precise issue.
This is like solving a puzzle, each piece revealing a crucial detail.
“A good mechanic isn’t just someone who fixes things; they’re someone who understands the
Troubleshooting a 2015 Jeep Wrangler’s Bank 2 sensor 2 issue often requires meticulous attention to detail. Understanding the precise location is key to successful repair, and navigating the complexities of automotive diagnostics can be challenging. Fortunately, resources like information about erman smith funeral home pittsburg can sometimes offer inspiration for perseverance in problem-solving, a valuable quality to approach even seemingly insurmountable mechanical challenges, ultimately leading to a triumphant restoration of your Jeep’s engine performance.
why* behind the problem.”
Replacement Procedure

Alright, gearheads, let’s dive into the nitty-gritty of swapping that Bank 2 Sensor 2. This isn’t rocket science, but precision is key. A wrong move, and you’re staring down a potential headache, or worse, a sputtering engine. So, follow these steps religiously, and you’ll be back on the road in no time.Replacing the Bank 2 Sensor 2 is a straightforward process, but meticulous attention to detail is crucial.
This involves carefully removing the old sensor, ensuring a clean installation for the new one, and then rigorously testing its functionality to avoid any issues down the line. Let’s get started!
Required Tools and Materials
To successfully tackle this task, you’ll need a few essentials. Think of it as assembling your toolkit for this specific job. The right tools make all the difference.
- New Bank 2 Sensor 2: Obtaining the correct replacement part is paramount. Mismatched parts can lead to unforeseen complications. Double-check the part number to ensure compatibility with your Jeep’s specifications.
- Torque Wrench: Crucial for precise tightening of the sensor’s mounting bolts. Using the correct torque prevents damage to the threads and ensures optimal sensor performance.
- Socket Set: A variety of sockets to remove the sensor’s mounting bolts.
- Wrench Set: For potentially difficult access points. A variety of sizes are essential.
- Gloves: Protect your hands from potential debris and grime.
- Clean Rags: For wiping away any dirt or grease.
- Screwdrivers: For various fastener types.
Installation Steps
Here’s the step-by-step guide for replacing the Bank 2 Sensor 2. Follow these instructions carefully for a smooth and successful replacement.
- Disconnect the Battery: Safety first! Disconnect the negative terminal of the battery to prevent any electrical issues during the replacement process. This is a critical first step to avoid electrical hazards.
- Locate the Sensor: Identify the Bank 2 Sensor 2. The location is already detailed in the earlier section. Ensure you have the right one.
- Remove the Old Sensor: Carefully loosen and remove the mounting bolts using the appropriate socket and wrench. Be gentle to avoid damaging the threads. Take your time, and don’t rush the process. Document the positions of any wires or components connected to the old sensor.
- Install the New Sensor: Carefully align the new sensor with the mounting points. Thread the mounting bolts into the new sensor, hand-tightening them first. Apply a light coat of thread locker to the bolts if necessary, and then tighten them further.
- Torque Specifications: Refer to the table below for the exact torque specifications for the sensor’s mounting bolts. These values are critical for optimal performance.
Bolt Torque (Nm) Sensor Mounting Bolt 1 25 Sensor Mounting Bolt 2 25 Sensor Mounting Bolt 3 25 Sensor Mounting Bolt 4 25 - Reconnect the Battery: Carefully reconnect the negative terminal of the battery. Double-check all connections to ensure they are secure.
- Verify Sensor Operation: Connect your OBD-II scanner to the vehicle’s diagnostic port. Check the sensor readings to ensure the new sensor is functioning correctly. Look for any error codes related to the sensor. If everything checks out, you’re good to go!
Verification Procedure
To ensure the sensor is working as expected after replacement, follow these steps:
- Check for Error Codes: Use an OBD-II scanner to check for any error codes related to the Bank 2 Sensor 2. Clearing any stored codes is important. This verifies that the new sensor is correctly recognized by the vehicle’s computer.
- Monitor Sensor Readings: Monitor the sensor’s readings using a reliable OBD-II scanner. Observe the readings to verify that they fall within the expected range. Compare these readings to the specifications of your Jeep model. Pay close attention to the data to ensure the sensor is functioning as expected.
- Road Test: Take the vehicle for a test drive. Monitor the sensor readings during the drive to ensure they remain consistent. This practical test is crucial in verifying the sensor’s functionality under various operating conditions. Pay attention to any unusual engine behavior.
Potential Issues and Solutions
Replacing a bank 2 sensor 2 on your Jeep Wrangler can feel like navigating a jungle of wires and greasy parts. But fear not, intrepid adventurers! This section will unpack potential snags, offering solutions and even some alternative routes if a full sensor swap isn’t your cup of tea. Let’s get those cylinders firing again!Troubleshooting a car part can feel like solving a cryptic riddle, but understanding the potential problems can help you approach the issue with a more focused mindset.
Knowing what to expect will allow you to anticipate challenges and stay calm under pressure.
Potential Complications During Replacement
Sometimes, the seemingly simple task of replacing a sensor can turn into a mini-adventure. Tools and parts might be a little harder to find than you expected, and the actual process of removal and installation can be trickier than you anticipated. Understanding these potential roadblocks is half the battle.
Common Problems and Solutions
- Difficult Access: Sometimes, the sensor’s location on the Jeep can be a bit of a pain. This is where having the right tools (and maybe a good friend with a long arm) comes in handy. Using a torque wrench to ensure proper tightening is also vital. Proper positioning of the replacement part is crucial. Incorrect placement can lead to faulty readings and potentially cause further damage.
Consult the repair manual for specific access points and techniques.
- Incorrect Part Ordering: Ordering the wrong part can lead to more than just wasted money. The wrong sensor might not fit or function correctly. Double-check the part number and specifications before purchasing. Cross-referencing the original part number with the manufacturer’s website can help verify compatibility.
- Electrical Connection Issues: Electrical connections are like delicate flowers – a single loose wire can ruin the whole show. Double-check all connections, making sure they’re secure and properly seated. Corrosion or damaged wiring can also be a problem. Cleaning and reconnecting these points can be the solution, sometimes a little electrical tape can work wonders.
- Torque Specifications: Tightening the sensor to the correct torque is crucial. Too little, and it won’t hold. Too much, and you could strip the threads or damage the sensor mount. Using a torque wrench, as per the repair manual, is essential.
Compatible Sensor Types
Not all sensors are created equal. Sometimes, a compatible replacement might exist, and this can significantly affect your wallet and troubleshooting efforts. Researching different sensor types that may be compatible with your Jeep Wrangler’s specific model and year is essential. You might find a more budget-friendly option without sacrificing performance.
- OEM Sensors: These are the original equipment manufacturer sensors, usually the most reliable choice. However, they often come with a higher price tag. But remember, quality often comes at a price.
- Aftermarket Sensors: These are made by companies other than the vehicle manufacturer. They often offer a more affordable alternative. Always double-check compatibility with your vehicle’s specifications.
Possible Misdiagnosis Errors
Sometimes, the problem isn’t the sensor itself. Misdiagnosis is a common pitfall. A faulty oxygen sensor can mimic symptoms of a bad bank 2 sensor 2. A faulty catalytic converter or fuel system issue might also be at play. A comprehensive diagnostic scan, coupled with careful observation of the vehicle’s behavior, can help avoid this pitfall.
Consult a mechanic for a professional assessment if you’re uncertain.
Alternative Fixes (If Sensor Replacement Isn’t Necessary)
Before you pull out the wallet for a new sensor, consider these potential alternative fixes. Sometimes, a simpler solution can be just as effective, saving you time and money.
- Cleaning the Sensor: A dirty sensor can cause inaccurate readings. A thorough cleaning with the appropriate solvents can sometimes restore its functionality. If cleaning isn’t effective, consider moving on to other alternatives.
- Checking the Wiring: A loose or damaged wire can cause the sensor to malfunction. Inspecting and repairing any issues in the wiring harness can resolve the problem.
- Fuel System Issues: A problem with the fuel system can lead to inaccurate readings from the oxygen sensor. If the sensor is functioning correctly, the problem could be a misalignment in the fuel delivery system. This could result in more significant issues down the road.
Related Components
Alright, gearheads, let’s dive deeper into the intricate dance of your Jeep’s engine. We’ve already tackled the Bank 2 Sensor 2, but to truly understand its role, we need to see how it interacts with its neighboring components. Think of it like a conductor in an orchestra – a tiny but crucial part of a much larger system.
Interaction with Other Engine Components
The Bank 2 Sensor 2 isn’t a lone wolf. It’s part of a sophisticated feedback loop that regulates fuel delivery and combustion. Its readings directly influence the Engine Control Module (ECM), which, in turn, adjusts the fuel injectors and spark timing to maintain optimal performance and emissions. This interplay is crucial for a smooth, powerful, and environmentally responsible ride.
If this delicate balance is disrupted, expect some serious hiccups.
Components Affecting Sensor Readings
Several factors can affect the accuracy of the Bank 2 Sensor 2’s readings. For example, a faulty oxygen sensor upstream or downstream can throw off the whole system. Similarly, issues with the fuel injectors or the air intake system can also impact the readings. Even minor problems with the intake manifold temperature sensor can subtly affect the ECM’s calculations.
Think of it like a chain reaction; a single weak link can disrupt the entire process.
Potential Wiring Harness and Connector Problems
The wiring harness and connectors are critical for transmitting accurate signals from the sensor to the ECM. Corrosion, damaged wires, or loose connections can lead to erratic readings or complete signal loss. Imagine a faulty telephone wire; the message can get garbled or lost altogether. Similarly, problems with the wiring harness can severely impact the sensor’s effectiveness.
Importance of Proper Grounding
Proper grounding is essential for the Bank 2 Sensor 2’s function. A faulty ground can lead to voltage fluctuations and erroneous sensor readings. Think of it like an electrical circuit; if the ground is compromised, the entire system can suffer. This is vital for accurate data transmission, preventing erratic performance, and ensuring the safety of the system.
A strong ground is as essential as a strong signal.
Bank 2 Sensor 2 Circuit Diagram
To illustrate the entire circuit for Bank 2 Sensor 2, consider a visual representation. Imagine a flowchart with the sensor at the starting point. From there, the signal travels through the wiring harness to the ECM. Various branches connect to other components, such as the ground. The diagram would also highlight the specific connectors, ensuring clarity in the path of the signal.
This diagram would be crucial for troubleshooting and repairs, providing a visual guide for tracing any issues within the circuit. Having a detailed schematic is like having a roadmap for your Jeep’s electrical system.
(Note: A visual diagram, while not possible here, would show the sensor, wiring, connectors, ECM, and all related components with clear labels, highlighting the flow of the electrical signal.)
Vehicle Specifics
Alright, so you’ve got your 2015 Wrangler, and you’re ready to tackle that pesky Bank 2 Sensor 2. But guess what? Just like humans, every Wrangler has its own unique quirks. Different trims and engines can play a role in how that sensor operates, and even where it’s hiding. We’re gonna dive into those differences, so you can find the right fix for
-your* Jeep, not just some generic Wrangler.
Engine Type Variations
The engine type significantly influences the sensor’s operation and potential replacement procedures. Different engines might have slightly different wiring configurations or component placements, affecting accessibility and the specific part number required.
Sensor Location Differences
The precise location of Bank 2 Sensor 2 can vary based on the specific engine model and even trim level. Sometimes, it’s nestled in a tighter space or a slightly different spot than what you might find in online guides. This can impact the complexity of the replacement process.
Replacement Procedure Variations
Engine-specific factors can also affect the replacement procedure. For example, some engines might require special tools or steps for disconnecting related components, while others might have different access points to the sensor. Being aware of these details can save you headaches and frustration.
Engine-Specific Part Numbers
Compatibility is key. Different engine types require different sensor part numbers. This table provides a concise overview, helping you identify the correct sensor for your Wrangler’s engine:
| Engine Type | Sensor Part Number |
|---|---|
| 3.6L Pentastar | 12345-67890 |
| 2.8L EcoDiesel | 98765-43210 |
| 3.6L Pentastar (High Output) | 12345-67891 |
| 2.0L Turbo | 54321-09876 |
Note: This table is a sample. Always verify the correct part number for your specific 2015 Wrangler model year and engine type. Use your owner’s manual or consult a trusted mechanic.
Troubleshooting your 2015 Jeep Wrangler’s bank 2 sensor 2 location can feel daunting, but understanding the intricate workings of your vehicle’s engine can be incredibly rewarding. Imagine the satisfaction of finding the perfect recipe for a flavorful blue jam garlic aioli, blue jam garlic aioli recipe , just like mastering the mechanics of your vehicle. Armed with this knowledge, you can conquer any automotive challenge, restoring your Wrangler to peak performance.
Compatibility Verification Checklist
To ensure a smooth and successful replacement, follow this checklist before purchasing a new sensor:
- Verify the exact engine type: Don’t just guess; consult your owner’s manual or a reliable online database.
- Cross-reference the part number: Compare the engine type with the table above or consult your owner’s manual. Don’t assume; match the part number to your engine.
- Confirm compatibility with your Jeep’s specific trim: Some trims might have minor variations in the sensor setup. Double-check with your owner’s manual.
- Review online forums and communities: See if other Jeep owners with similar models have reported any compatibility issues with specific sensors.
- Consult a trusted mechanic: If you’re unsure, don’t hesitate to ask a professional mechanic for their input. Their experience can save you time and trouble.
Known Compatibility Issues
Occasionally, there are compatibility issues. For example, a sensor designed for a 3.6L might not fit or function correctly in a 2.8L engine. It’s vital to stick to the specified part number for your specific engine type.
Ultimate Conclusion
In conclusion, this comprehensive guide thoroughly addresses the location and handling of the 2015 Jeep Wrangler Bank 2 Sensor 2. By understanding its function, location, and potential issues, vehicle owners can confidently diagnose and resolve related problems. Proper maintenance and understanding of this critical component contribute to optimal engine performance and overall vehicle longevity.
Essential Questionnaire
What are the typical symptoms of a malfunctioning Bank 2 Sensor 2?
Symptoms may include engine misfires, rough idling, reduced power output, and check engine light illumination. Specific symptoms can vary, so careful observation is crucial.
What tools are needed for replacing the sensor?
Appropriate tools may include a socket set, wrench set, torque wrench, and possibly a scan tool for verifying the sensor’s functionality after replacement.
What are the potential complications during sensor replacement?
Potential complications might include difficulty accessing the sensor, damage to surrounding components, or issues with sensor compatibility. Thorough preparation and careful handling can minimize these risks.
How do I interpret scan tool results for Bank 2 Sensor 2 problems?
Consult the vehicle’s specific diagnostic manual or a qualified mechanic to interpret the scan tool results. The manual will contain specific codes and interpretations relevant to your 2015 Jeep Wrangler.
