4th of July toe nail ideas are about to get lit! Get ready to unleash your inner artist and turn those toes into tiny works of art for the Independence Day celebrations. From classic red, white, and blue to fiery firework displays, we’ve got tons of trendy ideas to make your feet the talk of the party.
Dive into a world of nail art techniques, from simple French tips to intricate stamping designs. We’ll cover everything you need to know, from the perfect color palettes to the essential tools and materials, plus some seriously cool ideas that’ll blow your mind.
4th of July Nail Art Themes
Selamat datang! The Fourth of July, a significant American holiday, is a time for celebration and expressing patriotism. Nail art provides a creative outlet to showcase the spirit of this special day. The vibrant colors and symbolic designs are reflected beautifully in artistic nail designs.
4th of July Nail Art Color Schemes
This section details various color palettes for 4th of July nail art, highlighting their significance and popular design examples. Choosing the right color scheme can effectively communicate the spirit of the holiday.
- Red, White, and Blue: This classic color combination embodies the American flag, a powerful symbol of national pride. Red, white, and blue nail art is a timeless choice for expressing patriotism. Popular designs include stripes, polka dots, and intricate patterns in these colors. The iconic red, white, and blue color scheme evokes a sense of unity and national identity, perfectly fitting the celebration of American independence.
- Patriotic: This theme encompasses various color palettes that represent the spirit of the holiday, often including shades of red, white, and blue. Beyond the flag’s colors, patriotic themes can incorporate elements like stars, stripes, eagles, and other symbols. For instance, designs with gold or silver accents can add an extra touch of sophistication and elegance.
- Fireworks: This theme captures the dazzling spectacle of fireworks, often featuring vibrant colors and patterns. The dynamic nature of fireworks mirrors the excitement and energy of the holiday. Designs often incorporate exploding fireworks, various color gradients, and shimmering effects to replicate the vibrant display.
- Stars and Stripes: This theme directly references the American flag, utilizing the stars and stripes motif. This classic design evokes the spirit of freedom and independence. It can be achieved through various techniques, such as nail art stickers, acrylic paints, or even nail decals.
- Floral: This theme introduces a touch of elegance and nature to the celebration. While less overtly patriotic, it can still evoke a celebratory mood. Flowers in red, white, and blue, or other festive colors, can be incorporated into designs to add a touch of visual appeal.
4th of July Nail Art Symbolism
Understanding the symbolism behind each theme enhances the creative process and provides deeper meaning to the designs.
| Theme | Color Palette | Symbolism | Examples |
|---|---|---|---|
| Red, White, and Blue | Red, White, Blue | American flag, patriotism, national pride | Stripes, polka dots, ombre gradients |
| Patriotic | Red, White, Blue, Gold, Silver | National pride, freedom, independence | Stars, stripes, eagles, abstract patterns |
| Fireworks | Multi-color | Celebration, excitement, energy | Exploding fireworks, gradients, glitter |
| Stars and Stripes | Red, White | American flag, freedom, independence | Stars and stripes, patterns, decals |
| Floral | Red, White, Blue, Festive Colors | Elegance, nature, celebration | Flowers, leaf patterns, floral motifs |
Nail Art Techniques for 4th of July
Embracing the vibrant spirit of the Fourth of July, nail art techniques allow for creative expressions of patriotism and festivity. These designs can range from subtle nods to the red, white, and blue to bolder, more elaborate representations of the holiday’s symbolism. From simple embellishments to intricate patterns, these techniques empower individuals to showcase their artistic flair and celebrate the spirit of Independence Day.These techniques provide a pathway to transform ordinary nails into extraordinary works of art.
By understanding the steps involved, anyone can create stunning 4th of July nail designs, reflecting their personal style and the joyous energy of the holiday.
Gradient Technique
The gradient technique creates a smooth transition between two or more colors, resembling a colorful sunset or a majestic flag. This technique is perfect for capturing the essence of the American flag’s colors or creating a celebratory, ombre effect.To execute the gradient technique, first prepare the nails with a base coat. Next, carefully apply a thin layer of the first color using a brush or a sponge.
Subsequently, add a thin layer of the second color, overlapping slightly with the first. Ensure a smooth transition between the colors. The gradient can be achieved by using a blending brush to mix colors. For a smoother effect, apply a top coat to seal the design and prevent chipping.
Stamping Technique
The stamping technique involves transferring pre-designed patterns onto the nails using a stamping plate and a special stamping tool. This technique allows for complex and detailed designs quickly and efficiently. This technique can easily incorporate intricate designs and patterns, including patriotic symbols like stars and stripes, or abstract designs reflecting the holiday’s vibrant spirit.To execute the stamping technique, first prepare the nails with a base coat.
Next, apply a thin layer of polish to the stamping plate. Using a stamping tool, gently press the tool onto the polish and then transfer the design onto the nail. Seal the design with a top coat for lasting results. Stamping plates are available in various designs and themes, making it easy to personalize the look.
Dotting Technique
The dotting technique involves creating small dots of color on the nails to create patterns, accents, or detailed embellishments. This technique allows for precise placement and can be used to create a multitude of effects, from subtle polka dots to complex starbursts, mimicking the celebratory spirit of the holiday.To execute the dotting technique, first prepare the nails with a base coat.
Then, using a dotting tool or a fine-tipped brush, carefully place dots of color onto the nails. Varying the size and spacing of the dots allows for unique designs. For example, small dots can be used to create a textured effect, or larger dots can be used to form a specific pattern. Seal the design with a top coat to protect it.
French Tip Technique
The French tip technique involves creating a classic French manicure with a white tip against a colored base. This technique is timeless and elegant, and it can be adapted to complement the Fourth of July theme by using patriotic colors. For example, the base color could be red, white, or blue, or a combination thereof.To execute the French tip technique, first prepare the nails with a base coat.
Next, apply a thin layer of white polish to the tips of the nails. Then, apply the base color to the rest of the nail. Ensure a clean and crisp line between the white tip and the base color. Finish by applying a top coat to protect the design.
Table of Nail Art Techniques
| Technique | Materials Required | Difficulty Level |
|---|---|---|
| Gradient | Nail polish in desired colors, brush or sponge, top coat | Medium |
| Stamping | Nail polish, stamping plate, stamping tool, top coat | Medium |
| Dotting | Nail polish, dotting tool or fine-tipped brush, top coat | Easy to Medium |
| French Tip | Nail polish in desired colors (white and base), top coat | Easy |
Materials and Tools for 4th of July Nail Art
Celebrating the Fourth of July with vibrant nail art requires careful selection of materials. Choosing the right tools and polishes ensures a smooth and enjoyable experience, leading to stunning results. The right combination of precision and creativity allows for diverse and impressive designs.Proper selection of materials and tools is crucial for achieving successful nail art. Careful consideration of the different types of nail polish, stencils, and art tools ensures a pleasant and effective application process, resulting in a beautiful and enduring finish.
The variety of options available allows for experimentation and the creation of unique designs.
Essential Tools and Materials
A range of tools and materials are necessary for creating intricate and beautiful 4th of July nail art. These include not only nail polish and stencils, but also other crucial items like brushes, and nail art tools.
- Nail Polish: A variety of colors and finishes are needed to capture the essence of the 4th of July. Acrylic polishes, for instance, offer durability and shine, while gel polishes provide a long-lasting finish. A selection of colors like red, white, blue, and gold, is essential to achieve patriotic designs. Consider the longevity of the finish when choosing.
- Nail Polish Remover: For removing nail polish or making adjustments to the design. Acetone-based removers are typically effective but can be harsh on the nails. Other options with less harsh chemicals exist and are becoming increasingly popular.
- Base Coat and Top Coat: These are essential for protecting the natural nail and ensuring a smooth, glossy finish. A base coat provides an even surface for the nail polish and protects the nail from staining. A top coat enhances shine and provides additional durability, resisting chipping and smudging.
- Nail Art Brushes: Various sizes and shapes of brushes are required for intricate designs. Fine-tipped brushes are ideal for details, while broader brushes are suitable for filling larger areas. Consider the quality and material of the brush when making your selection.
- Stencils: Stencils are useful for creating precise patterns and designs. Choose stencils that are durable and easy to use. Different stencil materials offer varying levels of durability and ease of use.
- Embellishments: Sparkly rhinestones, glitter, and other embellishments add flair and visual interest. These elements enhance the visual appeal of the design and can range from simple to complex.
Comparing Types of Materials
Different types of nail polish, stencils, and tools offer varying advantages and disadvantages. Understanding these characteristics allows for informed choices based on the desired effect and the skill level of the artist.
| Material | Type | Benefits | Drawbacks |
|---|---|---|---|
| Nail Polish | Acrylic, Gel, Regular | Durability, Shine, Variety of Colors | Potential for damage if not properly applied, different application methods |
| Stencils | Paper, Plastic, Vinyl | Precision, Ease of use, Variety of Designs | Potential for tearing or damage, not suitable for all designs |
| Nail Art Tools | Brushes, Dotting Tools, Sponges | Precision, Variety of techniques | Requires skill to use effectively, potential for uneven application |
Ready-to-Use Supplies
A variety of pre-made nail art supplies are readily available for purchase. These include pre-made nail art kits, individual embellishments, and various types of polish.
- Pre-made Nail Art Kits: These kits often contain all the necessary supplies for a specific design, simplifying the process.
- Individual Embellishments: These are readily available in craft stores, online retailers, and beauty supply stores.
- Nail Polish Sets: Many retailers offer sets of nail polish in a variety of colors, which can be helpful for a 4th of July theme.
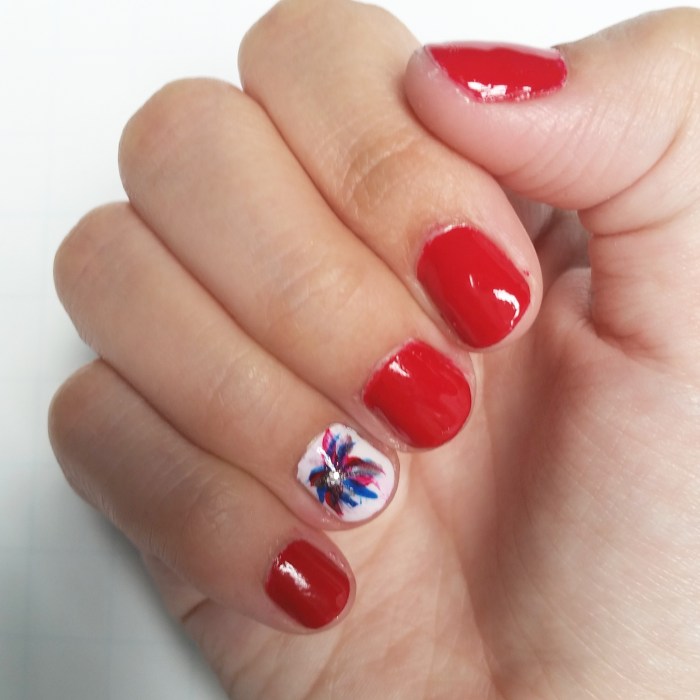
Creative 4th of July Nail Art Ideas: 4th Of July Toe Nail Ideas
The 4th of July, a celebration of freedom and independence, calls for vibrant and patriotic nail art. These designs, inspired by the spirit of the holiday, offer a spectrum of options to express your unique style while honoring the occasion.
Unique 4th of July Nail Art Designs, 4th of july toe nail ideas
These designs aim to capture the essence of the 4th of July festivities, from the vibrant colors to the celebratory patterns. Each design offers a distinct approach to nail artistry, ensuring a memorable look.
- Firework Explosion: This design showcases a dynamic display of fireworks. Imagine a gradient of reds, oranges, yellows, and blues, creating a mesmerizing firework burst effect. Use metallic gold or silver glitter to accentuate the explosions. For application, you can use freehand techniques, layering colors, or even use nail art stickers featuring firework silhouettes for an easier approach.
This technique emphasizes the vibrancy of the night sky on Independence Day.
- Starry Night: This design replicates the night sky on the 4th of July. Use a dark navy blue base color, and then strategically place white or light gray star-shaped nail art stickers in various sizes across each nail. Add a touch of sparkle by using iridescent glitter for extra shine. This approach uses stickers for efficiency, while the color scheme evokes the nocturnal beauty of the celebration.
- American Flag Stripes: A classic yet customizable design. Create horizontal stripes in red, white, and blue. Use a combination of nail polish colors for the stripes, and use a fine-tipped brush to precisely paint each stripe. To add depth, use a metallic or shimmery top coat on the white stripes. This method highlights the national colors and their significance on Independence Day.
- Geometric Patriotic: A modern take on the theme. Employ geometric shapes like triangles, squares, and rectangles in red, white, and blue. Use different shades of the colors to create a contrast and visual interest. Apply these shapes using nail art stickers or freehand techniques. This method provides a contemporary approach, combining patriotic colors with geometric designs.
- Patriotic Watercolor: A unique artistic approach. Use different shades of red, white, and blue nail polish. Apply these colors using a watercolor technique, creating subtle blends and gradients to evoke a natural, artistic feel. Use a fine-tipped brush to add small details, such as stars or stripes, for extra flair. This method offers a more abstract and artistic take on the 4th of July theme, showcasing creativity and unique style.
Nail Art Design Table
| Design | Colors | Embellishments | Application Method | Visual Description |
|---|---|---|---|---|
| Firework Explosion | Red, orange, yellow, blue, gold/silver | Glitter (gold/silver) | Freehand, layering, stickers | Vibrant gradient colors forming firework bursts. Metallic glitter adds extra shine to the explosions. |
| Starry Night | Dark navy blue, white/light gray | Iridescent glitter | Stickers, freehand | A dark base with strategically placed stars in varying sizes. Iridescent glitter adds a touch of sparkle to the stars. |
| American Flag Stripes | Red, white, blue | Metallic/shimmery top coat | Nail polish, fine-tipped brush | Classic horizontal stripes. Metallic top coat on the white stripes adds depth and shine. |
| Geometric Patriotic | Red, white, blue (different shades) | None | Nail art stickers, freehand | Geometric shapes (triangles, squares, rectangles) in patriotic colors. Different shades create visual interest. |
| Patriotic Watercolor | Various shades of red, white, blue | Fine details (stars, stripes) | Watercolor technique, fine-tipped brush | Subtle blends and gradients in patriotic colors. Small details add flair and artistic touch. |
Tips for Creating Professional-Looking 4th of July Manicures
The vibrant hues and festive designs of the 4th of July demand a manicure that reflects the spirit of celebration. A professional-looking manicure elevates the aesthetic appeal of the nails, showcasing meticulous attention to detail and a keen eye for artistry. This section will delve into essential techniques to achieve such a result.Achieving a flawless manicure requires a meticulous approach, beginning with proper nail preparation.
A clean and well-maintained nail bed is the foundation for a stunning design. Ignoring this initial step can lead to inconsistencies in application and ultimately affect the longevity and overall appearance of the finished product.
Importance of Proper Nail Preparation
Thorough nail preparation ensures a smooth surface for nail polish application, maximizing adhesion and longevity. This involves trimming and shaping the nails to a desired length and contour. File the nails to a consistent shape, ensuring all edges are smooth and free of sharp points. Next, gently push back cuticles and trim any excess skin around the nail plate.
Using a cuticle remover or oil can soften and smooth the cuticles for easier manipulation.
Achieving a Polished and Even Finish
A polished and even finish is crucial for a professional-looking manicure. Begin by applying a base coat to create a uniform surface for the nail polish and provide a protective layer. Using a thin, even coat is vital. Avoid applying too much product, as it can lead to an uneven or thick finish. Allow the base coat to dry completely before proceeding to the next step.For a consistent and even color application, use a brush that allows for smooth, controlled strokes.
Apply the nail polish in thin, overlapping coats, ensuring each coat is completely dry before adding the next. This method ensures that the polish adheres evenly and avoids streaking or uneven coloration.
Techniques for Creating Sharp Lines and Detailed Designs
Sharp lines and intricate designs are key elements of a professional manicure. Precise application is paramount. Utilize fine-tipped brushes or stencils to create intricate patterns or detailed designs. Practice controlling the pressure of the brush to achieve clean lines and avoid smudging or blurring.To create a clean and precise design, carefully consider the placement of the lines and shapes.
Using stencils can be particularly useful for creating sharp lines and repeating patterns. Experiment with different brush techniques to achieve unique and personalized designs.
Applying Top Coat and its Significance
Applying a top coat is the final step in achieving a professional-looking manicure. A top coat seals the nail polish, providing a protective layer that enhances the shine and prevents chipping. A top coat also protects the manicure from daily wear and tear, extending its longevity. Apply a thin, even coat of top coat, allowing it to dry completely.
Variations for Different Nail Shapes and Lengths

Marvellous 4th of July nail art can be adapted to suit diverse nail shapes and lengths, creating a unique look for every style. From the delicate curves of almond nails to the strong lines of coffin nails, and from petite short nails to elongated elegant ones, each shape and length offers a canvas for artistic expression. This section delves into tailoring designs for optimal aesthetics, taking into account the nuances of different nail forms.Understanding the interplay between nail shape, length, and design is crucial for achieving a captivating 4th of July manicure.
Different nail shapes have inherent characteristics that lend themselves to specific designs. For instance, the pointed tips of coffin nails may lend themselves to sharp, intricate designs, while the rounded edges of almond nails might be better suited to more flowing, elegant patterns. The length of the nail also impacts the scale and complexity of the design.
Almond Nails
Almond-shaped nails, with their graceful curves, offer a versatile platform for a variety of 4th of July designs. For short almond nails, opt for smaller, more intricate patterns, such as tiny firework designs or mini star embellishments. Medium-length almond nails allow for a greater range of options, including subtle ombre effects with red, white, and blue hues, or detailed firework designs with glitter accents.
Sparkling red, patriotic blue, or maybe a touch of green for the Fourth of July? The possibilities for nail art are endless, but if you’re seeking a bit more information about local resources, consider checking out the Lenoir Housing Authority Lenoir NC lenoir housing authority lenoir nc. Ultimately, let your creativity soar and paint those toes a vibrant celebration of independence!
Long almond nails can showcase elaborate 4th of July motifs, such as large-scale firework explosions, American flag patterns, or even patriotic-themed floral arrangements. In all cases, the focus should be on designs that complement the gentle curves of the almond shape.
Square Nails
Square nails, with their straight lines and strong edges, lend themselves well to bold and structured 4th of July designs. Short square nails are ideal for simple, geometric patterns like stripes, or small, geometric firework shapes. Medium-length square nails allow for more intricate patterns such as detailed flag designs or overlapping geometric patterns with vibrant colours. Long square nails are excellent for elaborate 4th of July designs like full-length flag art or detailed firework designs with 3D embellishments, utilizing the length for impactful visual impact.
Careful attention to symmetry and sharp lines is key when working with square nails.
For those seeking captivating 4th of July toe nail ideas, consider the vibrant hues and designs. Charming Nails Blue Bell PA, a local favorite, boasts a plethora of creative nail art options, perfect for expressing your patriotic spirit. Whether you prefer subtle pops of color or bold, statement pieces, their skilled artists can craft the ideal 4th of July toe nail design.
charming nails blue bell pa can help you find the perfect look for your Independence Day festivities. So, get ready to showcase those fabulous feet!
Coffin Nails
Coffin nails, with their sharp points, create a dramatic backdrop for bold 4th of July nail art. Short coffin nails can still showcase strong designs, such as geometric patterns with patriotic colours, or a minimalist approach with just a few carefully placed accents. Medium-length coffin nails provide a perfect platform for detailed designs, including intricate firework displays or flag stripes that follow the shape of the nail.
Long coffin nails are perfect for impactful designs, such as large-scale flag patterns that stretch the length of the nail or elaborate firework displays that complement the sharp point. Employing techniques like negative space and bold colours can maximize the visual appeal of coffin nails.
Closing Notes
So, get ready to paint those toes in patriotic pride! Whether you’re a seasoned nail artist or just starting out, these 4th of July toe nail ideas are sure to inspire you to create your own unique masterpiece. We’ve covered everything from design themes to techniques, so get those creative juices flowing and unleash your inner fashionista!
FAQs
What are some easy 4th of July toe nail ideas for beginners?
Simple French tips with red, white, and blue stripes or a gradient design using red, white, and blue polishes are great options. You can also use nail art stickers for easy firework or star patterns.
What are some tools I’ll need for 4th of July nail art?
Basic tools include nail polish (in your desired colors), nail clippers, cuticle pusher, a base coat, top coat, and any embellishments you want to add (like glitter, rhinestones, etc.). Some techniques may require additional tools like stencils or stamping plates.
Can I do 4th of July nail art on short toes?
Absolutely! Smaller designs or simpler patterns work well on shorter nails. You can create cute, subtle designs that won’t overwhelm the look. Consider using stickers or stamping for easy application.
