Can you put a clear coat over nail stickers? This guide dives deep into the world of nail art, exploring the possibilities and potential pitfalls of layering clear coats over nail stickers. From choosing the right clear coat to mastering the application process, we’ll equip you with the knowledge to achieve stunning nail designs with lasting results.
Nail stickers are a fantastic way to add instant flair to your manicure. But often, a crucial step is often overlooked: adding a clear coat. This step can enhance the overall look, protect the stickers, and increase their longevity. This guide provides detailed information on various aspects of this topic, ensuring you’re well-prepared to create beautiful, long-lasting nail designs.
Overview of Nail Stickers and Clear Coats
A symphony of artistry unfolds on the nail, a canvas of creativity where nail stickers and clear coats intertwine. These seemingly simple components, when masterfully combined, can transform a plain manicure into a captivating masterpiece. From delicate floral designs to bold geometric patterns, nail stickers offer a vast spectrum of possibilities, while clear coats act as a protective shield and a finishing flourish.
This exploration delves into the nuances of both, revealing the artistry and science behind their harmonious union.Nail stickers, the miniature masterpieces of design, come in a plethora of styles and materials. Some are made of durable vinyl, allowing for a long-lasting design. Others, crafted from a more delicate material, offer a temporary, almost ephemeral touch. The choice of material often dictates the design’s durability and the required application technique.
The range of designs is truly breathtaking, from intricate floral patterns to bold geometric shapes, and abstract art.
Types of Nail Stickers, Can you put a clear coat over nail stickers
Nail stickers are available in various materials, each with its unique characteristics. Vinyl stickers, known for their robustness, offer a vibrant array of colors and designs, perfect for bold statements. Paper stickers, often featuring delicate or intricate patterns, add a touch of elegance and finesse. The choice between vinyl and paper hinges on the desired level of durability and the specific design aesthetic.
The adhesive backing ensures secure placement, enabling long-lasting designs.
Types of Clear Coats for Nail Art
Clear coats, the final touchstones of nail art, provide a protective barrier and a dazzling finish. Top coats, designed for a high-gloss shine, are often used for their reflective quality. Base coats, while clear, are formulated to enhance adhesion and prevent staining. A variety of formulations exists, catering to different needs and preferences.
Benefits of Using Clear Coats on Nail Stickers
Clear coats are essential for enhancing the life of nail stickers. They act as a protective shield, safeguarding the delicate design from chipping and wear. They also offer a flawless finish, smoothing out any imperfections and lending a polished appearance. This layer of protection significantly extends the lifespan of the nail art, allowing for longer-lasting enjoyment of the design.
Potential Risks or Drawbacks of Using Clear Coats on Nail Stickers
While clear coats offer many benefits, improper application or the use of incompatible products can present challenges. Applying too thick a layer can lead to a sticky or uneven finish, and the wrong type of clear coat can cause the stickers to lose adhesion or peel. It is essential to select the appropriate clear coat based on the sticker’s material and the desired outcome.
Comparison of Clear Coat Types for Nail Stickers
| Type | Durability | Shine | Cost |
|---|---|---|---|
| Gloss Top Coat | High | High | Moderate |
| Matte Top Coat | Moderate | Low | Moderate |
| Base Coat | Moderate | Low | Low |
This table offers a concise overview of different clear coat types, highlighting their respective durability, shine, and price points. Choosing the right type is crucial for optimal results, ensuring the nail art remains vibrant and protected for extended periods.
Application Procedures
A symphony of precision and artistry unfolds in the application of nail stickers, a delicate dance between preparation and application. The artistry begins with a meticulous understanding of the process, ensuring the stickers adhere flawlessly and the clear coat provides a protective, polished finish. This meticulous approach yields results that are both aesthetically pleasing and long-lasting.The success of nail sticker application hinges on the meticulous preparation of the nail plate.
A clean, smooth surface is the foundation upon which the sticker’s beauty is built. This preparation ensures optimal adhesion, preventing the sticker from lifting or peeling prematurely. A well-prepped nail is the canvas upon which the sticker’s design is brought to life, a harmonious union of precision and aesthetic delight.
Nail Preparation
Thorough nail preparation is crucial for the longevity and aesthetic appeal of nail stickers. This involves removing any existing nail polish, ensuring a smooth, even surface. Proper nail preparation sets the stage for successful application, allowing the stickers to adhere firmly and enhancing their overall visual appeal. Moisturizing the nails before applying stickers can also improve adhesion.
Sticker Application
Precise placement is key to a flawless application. Position the sticker carefully, aligning it with the desired location on the nail. Gentle pressure, without excessive force, ensures the sticker adheres securely. Applying stickers with precision allows the design to be showcased to its full potential.
Clear Coat Application Methods
Several techniques enhance the durability and aesthetic appeal of the finished look. The clear coat acts as a protective shield, preventing damage and enhancing the longevity of the design.
Thin Layers
Applying thin, even layers of clear coat prevents the build-up of excess product, reducing the risk of imperfections and maintaining a polished finish. This meticulous approach ensures the clear coat complements the stickers rather than obscuring their beauty.
Multiple Coats
Building up multiple thin layers of clear coat provides superior protection and enhances the shine of the stickers. Each layer should be allowed to dry completely before applying the next, ensuring a smooth, consistent finish.
Specific Techniques
A variety of methods can be employed to achieve different effects. Using a brush to apply a fine layer of clear coat in specific areas, like around the edges of the sticker, ensures a precise finish.
Step-by-Step Guide
| Step | Action | Image Description |
|---|---|---|
| 1 | Prepare nails by removing existing polish and buffing for smoothness. | Image: Hands with nails being prepped, showing a clean, smooth surface. |
| 2 | Carefully place the sticker on the nail, ensuring alignment. | Image: A sticker being placed precisely on a nail. |
| 3 | Apply a thin layer of clear coat, allowing it to dry completely. | Image: A thin layer of clear coat being applied evenly over the sticker. |
| 4 | Repeat steps 3 for multiple coats if desired, allowing each coat to dry completely. | Image: Multiple layers of clear coat being applied, with each layer visibly distinct. |
| 5 | Apply a final, thin layer of clear coat to smooth out any imperfections. | Image: A final layer of clear coat being applied with precision to cover the entire nail. |
Effects and Results
A veil of artistry, a whisper of protection – clear coats, when applied judiciously over nail stickers, transform the ephemeral into the enduring. They elevate the artistry, enhancing the vibrancy and longevity of the design, weaving a tapestry of color and shine.Clear coats, like a delicate glaze, not only protect the delicate stickers from the wear and tear of daily life but also subtly alter the visual impact, creating captivating variations in the final look.
Visual Effects of Clear Coats
Clear coats offer a spectrum of finishes, each contributing a unique aesthetic dimension to the nail sticker design. The application of clear coat can transform a simple sticker into a polished piece of artistry. Glossy finishes amplify the brilliance of the stickers, reflecting light like a captured sunbeam. Matte finishes, on the other hand, create a subtle, sophisticated texture, offering a softer, more understated appearance.
A shimmering shield, a clear coat’s embrace, protects nail stickers’ artistry, a vibrant hue. To safeguard their painted perfection, a clear coat’s protective touch is key, just as the dazzling fireworks of Red Bank, NJ, in 2024, Red Bank NJ fireworks 2024 , ignite the night sky with a breathtaking spectacle. This lustrous layer, a final flourish, ensures your nail art’s beauty endures.
Shimmering clear coats add a touch of magic, imbuing the nail sticker with an ethereal sparkle.
Longevity and Durability
The presence of a clear coat significantly increases the longevity of nail stickers. This protective layer acts as a shield against the daily rigors of activity, extending the lifespan of the design. Without a clear coat, stickers are more susceptible to chipping, smudging, and overall wear. The protective barrier provided by the clear coat enhances the durability, allowing the design to remain vibrant for longer periods.
Comparison of Durability
The durability of nail stickers is significantly enhanced with a clear coat. Consider the difference between a delicate flower painted on paper versus the same flower meticulously protected by a clear coat on a sticker. The clear coat acts as a protective barrier, reinforcing the structure of the sticker and preventing damage.
Impact on Aesthetic Appeal
The clear coat not only protects the nail stickers but also profoundly impacts the overall aesthetic appeal. A clear coat acts as a final touch, enhancing the depth and richness of the design. The added layer of polish creates a professional, polished look, amplifying the beauty of the design.
Achievable Finishes
Clear coats offer a diverse array of finishes, allowing for the creation of a myriad of looks. The glossy finish, reflecting light like a polished gem, exudes a sophisticated elegance. The matte finish, on the other hand, offers a softer, more understated appeal, creating a calm and refined aesthetic. The shimmering finish, with its subtle sparkle, evokes a touch of enchantment and allure.
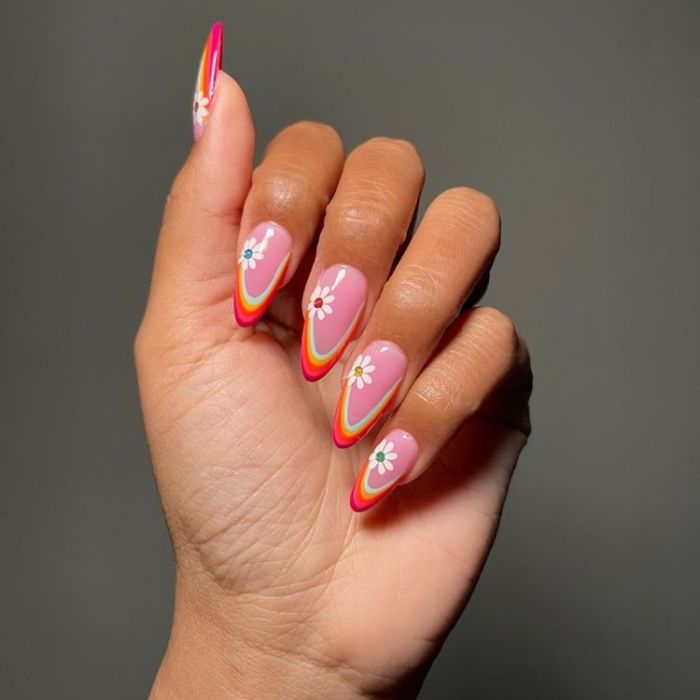
Examples of Nail Sticker Designs
| Nail Sticker Design | Clear Coat Application | Resulting Effect |
|---|---|---|
| Floral motifs | Glossy clear coat | Sophisticated, elegant, vibrant flowers |
| Geometric patterns | Matte clear coat | Modern, understated, sophisticated geometric patterns |
| Metallic stickers | Shimmering clear coat | Glamorous, eye-catching, metallic shimmer |
| Abstract art | Glossy or matte, depending on design | Modern, unique, striking visual effect |
Troubleshooting and Common Issues
A symphony of flawless nail art can be disrupted by unforeseen difficulties. Understanding the potential pitfalls and possessing the right tools and techniques is crucial to achieving a polished and professional finish. Let us delve into the common problems that can arise when layering clear coats over nail stickers and discover effective solutions to ensure a stunning, lasting result.
Identifying Common Problems
Nail art, while captivating, can present unexpected challenges. Bubbles, uneven coats, and premature chipping can mar the masterpiece. Each problem stems from a specific set of circumstances, and understanding these causes is paramount to preventative measures.
Causes and Solutions for Uneven Coats
Uneven coats often stem from inconsistent application of the clear coat. Applying the coat too thickly in one area while skimping on another leads to a noticeably uneven finish. Ensure a consistent and light application across the entire sticker area, using a thin, even stroke. An inadequate amount of base coat underneath the sticker, creating an uneven surface, can also cause uneven coats.
Ensure a solid base layer that adheres uniformly to the sticker.
Addressing Bubbles
Bubbles, those pesky imperfections, can disrupt the aesthetic harmony of your nail art. Trapped air pockets within the clear coat can mar the final look. A slow and meticulous application, ensuring proper drying time between coats, helps minimize air entrapment. Also, excessive pressure when applying the clear coat can lead to bubbles. A gentle, controlled motion is crucial.
Can a clear coat shield nail stickers’ vibrant hues? A prudent question, akin to pondering the intricate details of questions to ask before buying a house , before committing to a lasting design. Like a fortress’s stone walls, a protective layer might be the key to enduring beauty. Ultimately, a thorough understanding of the sticker’s composition, and the coat’s properties, is crucial to ensuring a lasting, flawless finish.
Preventing Chipping
Chipping, a common adversary of nail art, often results from inadequate adhesion between the clear coat and the sticker. Ensure that the nail sticker is properly adhered to the nail plate, using a suitable adhesive, if necessary. Weak adhesion between the sticker and the clear coat is another factor. Proper curing of each coat, allowing sufficient drying time, enhances bonding.
Importance of Correct Tools and Techniques
Utilizing the right tools and employing effective techniques are fundamental to achieving a flawless finish. A fine-tipped brush is essential for precise application, allowing for even coverage and minimizing the risk of bubbles. Appropriate drying time is also vital. Applying a thin layer of clear coat and allowing ample drying time between coats is crucial to preventing bubbles.
Troubleshooting Table
| Potential Issue | Cause | Troubleshooting Steps |
|---|---|---|
| Bubbles | Trapped air, applying too much pressure, insufficient drying time between coats | Apply thin, even coats. Allow adequate drying time. Ensure proper application techniques and use a fine-tipped brush. |
| Uneven Coats | Inconsistent application, insufficient base coat, uneven sticker adhesion | Apply thin, even coats. Use a fine-tipped brush for precise application. Ensure a solid, even base layer underneath the sticker. |
| Chipping | Inadequate adhesion between clear coat and sticker, insufficient curing | Ensure proper sticker adhesion. Allow sufficient drying time between coats. Use a suitable adhesive if necessary. |
Variations and Alternatives
A symphony of shimmering hues awaits, but the canvas of the nail requires a skilled hand to orchestrate its beauty. Beyond the foundational clear coat, a world of alternatives awaits, each with its own unique properties and potential. Understanding these variations allows the nail artist to sculpt designs with precision and finesse, transforming ordinary nail stickers into extraordinary works of art.Beyond the basic clear coat, a spectrum of protective and decorative treatments blossoms.
These alternatives, much like carefully chosen instruments in a musical ensemble, each offer distinct advantages and disadvantages, affecting the final outcome in both subtle and dramatic ways.
Different Types of Clear Coats
Various clear coats, each with a unique composition, influence the look and longevity of nail stickers. A high-quality, durable clear coat offers protection against chipping and wear, ensuring the nail sticker remains vibrant and intact. A glossy top coat accentuates the design’s brilliance, while a matte top coat creates a subtle, sophisticated finish. Consider the desired effect when selecting the appropriate clear coat.
Comparison with Other Protective Treatments
Protective treatments beyond clear coats include specialized sealants or resin-based coatings. These offer heightened durability and resistance to scratches and impacts, ideal for high-wear environments. However, they may alter the initial appearance of the sticker. The choice between clear coats and other treatments depends on the specific needs and aesthetic preferences.
Alternative Methods for Enhancing Nail Stickers
Enhancing nail stickers transcends the realm of simple coatings. Glitter top coats, for instance, infuse the design with a captivating sparkle. Metallic or iridescent top coats introduce a touch of glamorous allure, highlighting the sticker’s design. These alternatives provide a plethora of options to further personalize and elevate the nail art. For example, adding rhinestones or intricate nail decals can add an extra layer of dimension and visual interest.
Impact of Different Brands
Brand variations in clear coats affect the final outcome in subtle but perceptible ways. Some brands provide exceptional adhesion, preventing stickers from lifting or peeling. Others offer a superior shine and durability. Thorough research and experimentation with different brands are key to discovering the perfect match for the specific nail sticker and desired effect.
Comparative Table of Clear Coat Alternatives
| Alternative | Properties | Cost | Results |
|---|---|---|---|
| Glossy Clear Coat | High shine, enhances color vibrancy | Moderate | Sleek, polished look |
| Matte Clear Coat | Soft, subtle finish, hides imperfections | Moderate | Sophisticated, understated style |
| Glitter Top Coat | Adds sparkle, enhances design | Variable | Playful, glamorous look |
| Metallic Top Coat | Adds shimmer and metallic effects | Variable | Elegant, sophisticated shine |
| Resin-Based Coating | Extreme durability, scratch resistance | High | Long-lasting, robust protection |
Note: Cost is relative and may vary depending on the specific product and retailer.
Tips and Tricks

A symphony of shimmering surfaces awaits, a meticulous dance between nail stickers and clear coat. Mastering this craft unlocks a universe of polished perfection, transforming simple adornments into captivating artistry. Careful consideration of application techniques, curing times, and desired effects will elevate your nail art to new heights.Clear coats, the guardians of glossy perfection, bestow a protective layer upon your nail stickers, preventing chipping and enhancing their vibrancy.
Understanding their subtle nuances unlocks the full potential of your creative endeavors.
Achieving a Professional Finish
Precision in application is paramount to achieving a professional-looking finish. Begin with a meticulously prepared nail bed, ensuring the sticker is adhered firmly and evenly. A smooth, even layer of clear coat is crucial for a flawless appearance. Apply thin, consistent coats, avoiding thick globs that can lead to unevenness and potentially, air bubbles. Allow ample time for each coat to dry before proceeding.
Curing Time and its Impact
Curing time, the period where the clear coat polymerizes, significantly influences the final result. Adequate curing time is crucial for preventing smudging, ensuring durability, and achieving a glossy sheen. The recommended curing time is dependent on the specific brand of clear coat and the strength of the light source used. Longer curing times typically result in a harder, more resilient finish, while shorter times may leave the coat more susceptible to damage.
Preventing Common Mistakes
Common mistakes often arise from haste and inattention to detail. A key preventative measure is to work in a well-lit area to minimize imperfections and ensure accuracy. A gentle touch and controlled application minimize the risk of bubbles or unevenness. Regularly checking the sticker’s adhesion and ensuring the coat adheres uniformly are essential steps in preventing smudging or lifting.
Creating Unique Effects
Beyond a basic protective layer, clear coats can be instrumental in crafting unique effects. Experiment with layering different shades of clear coat to create a gradient or ombre effect. Adding a touch of shimmer or glitter to a clear coat layer can elevate the aesthetic. A subtle textured clear coat can add dimension and depth to the design.
Practical Tips for Applying Clear Coats
- Prime the nail bed with a base coat for enhanced adhesion and a smoother surface.
- Apply thin, even coats of clear coat, allowing each layer to dry completely before proceeding.
- Use a fine-tipped brush for precise application, particularly around the edges of the sticker.
- Employ a UV or LED lamp to cure each coat according to the manufacturer’s instructions.
- Ensure adequate ventilation during the curing process to prevent any unwanted fumes or odors.
- Employ a top coat to further enhance shine and protect the design from damage.
Last Point: Can You Put A Clear Coat Over Nail Stickers
In conclusion, applying clear coat to nail stickers is a worthwhile practice for enhancing the appearance and durability of your nail designs. By understanding the different types of clear coats, proper application techniques, and potential troubleshooting steps, you can confidently create stunning and long-lasting nail art. This guide provides a comprehensive overview, empowering you to make informed decisions and achieve professional-looking results.
Popular Questions
Can different types of clear coats affect the look of the nail stickers?
Yes, different clear coats have varying levels of shine, durability, and texture. Some might create a glossy finish, while others offer a matte effect. Consider the desired outcome when selecting a clear coat.
How many coats of clear coat should I apply?
Generally, two to three thin coats of clear coat are sufficient. Applying too many thick coats can lead to a build-up, potentially affecting the look and longevity of the nail stickers.
What if my clear coat is bubbling?
Bubbling in the clear coat can be caused by inadequate curing time or using a coat that isn’t properly thinned. Ensure your nails are completely dry before applying the next layer and try thinning the clear coat if necessary.
Can I use a top coat instead of a clear coat for nail stickers?
While some top coats can offer protection, clear coats are specifically formulated to adhere well to nail stickers and offer added protection. Top coats might not provide the same level of durability.
